-
-
-
-
-
- Data Grid
- Data Grid Columns
- Open a Data Grid
- Sort Data Grid Columns
- Filter Data Grid
- Data Grid Grouping
- Merge Cells in Data Grid
- Data Grid Formatting
- Data Grid - Conditional Formatting
- Data Grid - Calculated Fields
- Data Grid Drill Down
- Data Grid Views
- Generate Report from Data Grid
- Refresh Data Grid
- Copy Data Grid Records
- Export Data Grid Data
- Show all articles ( 1 ) Collapse Articles
-
- Pivot Grid
- Pivot Grid Areas
- Pivot Grid Fields
- Pivot Grid Summarize
- Format Pivot Grid Fields
- Expand - Collapse Pivot Grid Columns
- Sort Pivot Grid
- Pivot Grid - Calculated Fields
- Pivot Grid Filters
- Pivot Grid Drill Down
- Pivot Grid Charts
- Pivot Grid Maps
- Pivot Grid Views
- Refresh Pivot Grid
- Export Data from the Pivot Grid
- Embed Pivot Grid into Report
- Show all articles ( 1 ) Collapse Articles
-
-
-
- Dashboard Items
- Dashboard Chart Item
- Dashboard Pie Item
- Dashboard Data Grid Item
- Dashboard Pivot Table Item
- Dashboard Gauge Item
- Dashboard Card Item
- Dashboard Scatter Chart Item
- Dashboard Treemap
- Dashboard Range Filter Item
- Dashboard Filter Elements Item
- Dashboard Text Item
- Dashboard Image Item
- Dashboard Group Item
-
-
-
-
- Schedule Server Jobs
- Add a Schedule Job - Simple Email
- Add Schedule Job - Merged Email
- Add Schedule Server Job - Merged Report
- Add Schedule Job - Alert DBxtra Users
- Add Schedule Server - Export Report Objects
- Add Schedule Job - FTP Upload
- Add Schedule Job - Print Report
- Add Schedule Job – Google Drive Upload
- Add Schedule Job – Dropbox Upload
- Add Schedule Job – Data Dump
- Edit - Delete Schedule Server Jobs
-
-
-
- DBxtra - Excel Reporting Service
- Install the XL Reporting Service
- XL Reporting Service - Driver Requirements
- XL Reporting Service Interface
- Connect Excel Reporting Service to DBxtra Report Repository and Login
- Insert the Report Object's Data into Excel
- Refresh Your Data
- Open DBxtra Reports and Dashboard from within Excel
- XL Reporting Service Security
-
- Articles coming soon
-
-
- Migrating the Report Web Service from legacy (DBxtra version 8.2.3 and prior) to responsive (DBxtra version 9.0.0 +)
- DBxtra version 7.1.0 on Internet Information Server – IIS 6
- DBxtra 7.1.0 on Internet Information Server – IIS 7
- DBxtra version 7.1 – Upgrade DBxtra Report Repository to SQL Server Express.
- How to configure DBxtra to use Internet Information Services on Windows Server 2012
- Open DBxtra reports in web browser on a new tab
- DBxtra 7 – Migrate the DBxtra Repository from a Network Share to Report Web Service
- Report Web Service: How to retain the minimalist menu look on custom styles (Legacy Report Web Service DBxtra ver. 8.2.3 amd prior)
- The Report Web Service shows empty reports or dashboards
- Pass login information from an external application to the DBxtra Report Web Service
- Pass login information from an external application to the DBxtra Report Web Service (DBxtra version 9+ - Responsive)
- Deploying the Report Web Service to Azure (Web Sites)
- What happens to report objects style customizations when I change interfaces in the Report Web Service
Add a Schedule Job – Simple Email
- Main
- DBxtra Schedule Server
- Design Schedule
- Schedule Server Jobs
- Add a Schedule Job - Simple Email
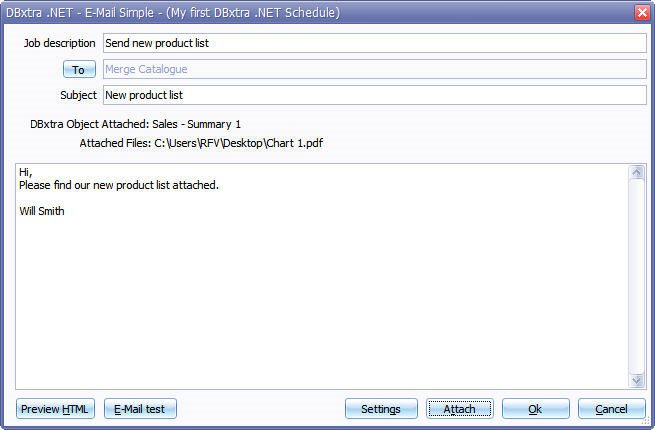
This option can be useful if you need to send a message to your contacts.
- Open the Schedule and click Add Job.
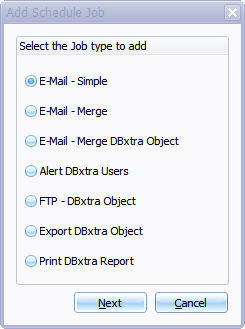
- Select E-mail – Simple.
- Click Next.
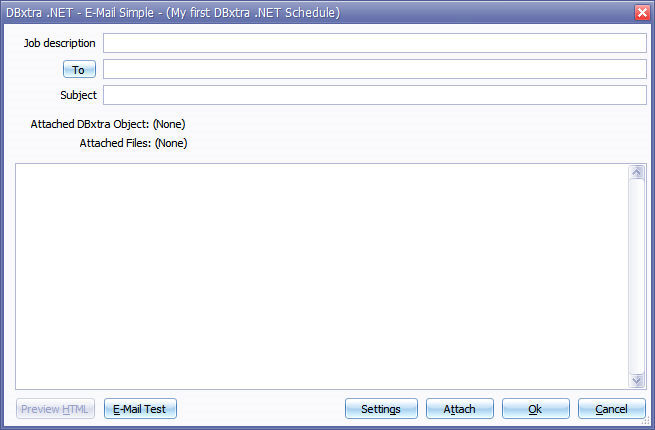
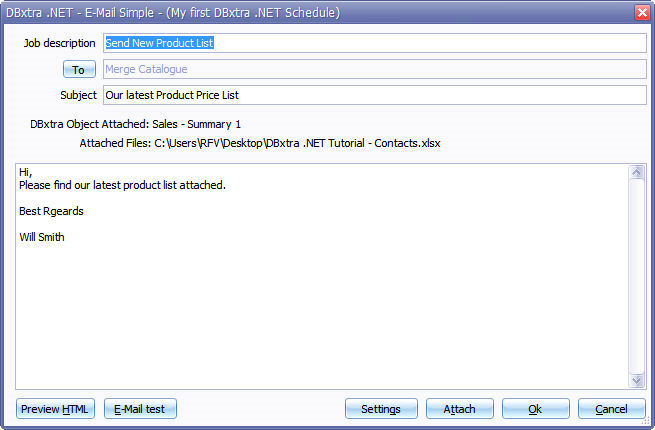
- Enter a Job description.
Add Contacts
- Enter E-mail addresses in the To field separated by , like Joe@1.com, frank@1.com.
- If you have a Merge Catalogue defined then you can assign contacts from it.
You can also define your Merge Catalogue for each Schedule Job individually.
- Click To .
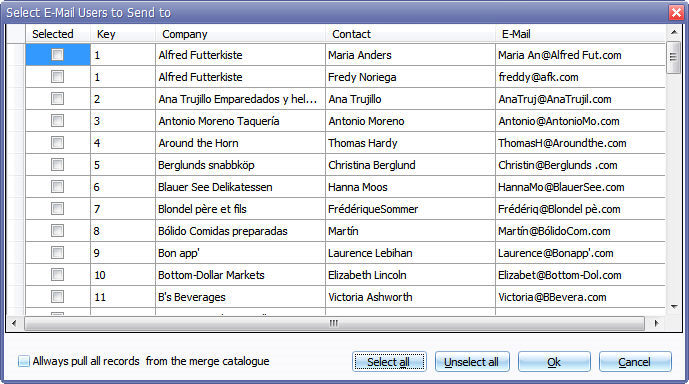
- You can select multiple contacts by clicking the check box.
- If you want to send the E-mail to all contacts contained in the Merge Catalogue then select Always pull all records from the merge catalogue .
- Click Ok .
Write the Message
- Enter a message into the body area. You can enter text and also HTML code.
- To preview your HTML message click Preview HTML .
Settings
The DBxtra Schedule takes configuration default settings from the Schedule Project Configuration but you can configure each Job’s settings individually by clicking the Settings button.
Attach
- You can add attachments by clicking the Attach button.
The attachment can either be a DBxtra object like a Query or Report or any other file.
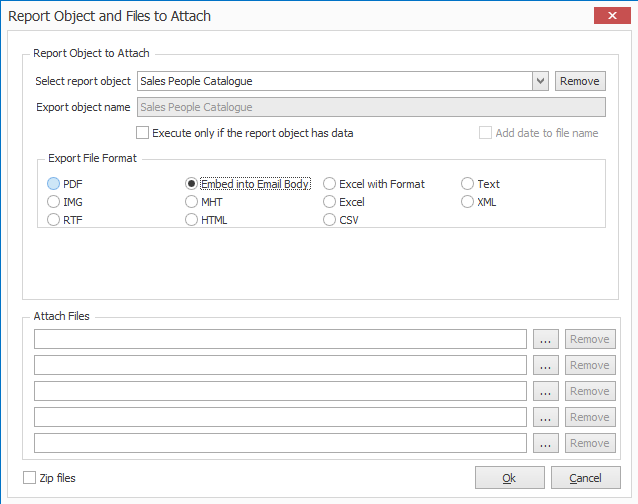
- Reports can be embedded into the Email body by selecting >Embed into Email body.
Important! By sending DBxtra Reports with this Job option, all your contacts will receive the same static Report.
See also: How to so send merged Reports to each contact.
- If you choose to attach a DBxtra Report select it from the drop down box and define in which format to send it.
Note! If a Report has an user-input Parameters , then when choosing it to be scheduled you’ll need to assign the Parameter.
The Report will be scheduled with the assigned Parameter.
DBxtra Queries can be sent as: Text; CSV, or XML file format.
DBxtra Reports can be sent as: PDF, HTML, Text; CSV, MHT, Excel, RTF, image or XML file format.
- Optionally select Zip files to compress files to be sent.
- Click Ok .
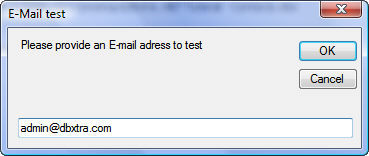
E-mail Test
- You can send an E-mail test to your self by clicking E-mail test.
This way you can check how the E-mail will arrive in your Inbox.
- When finished with the Jobs setup click Ok .
The new Job will be added.
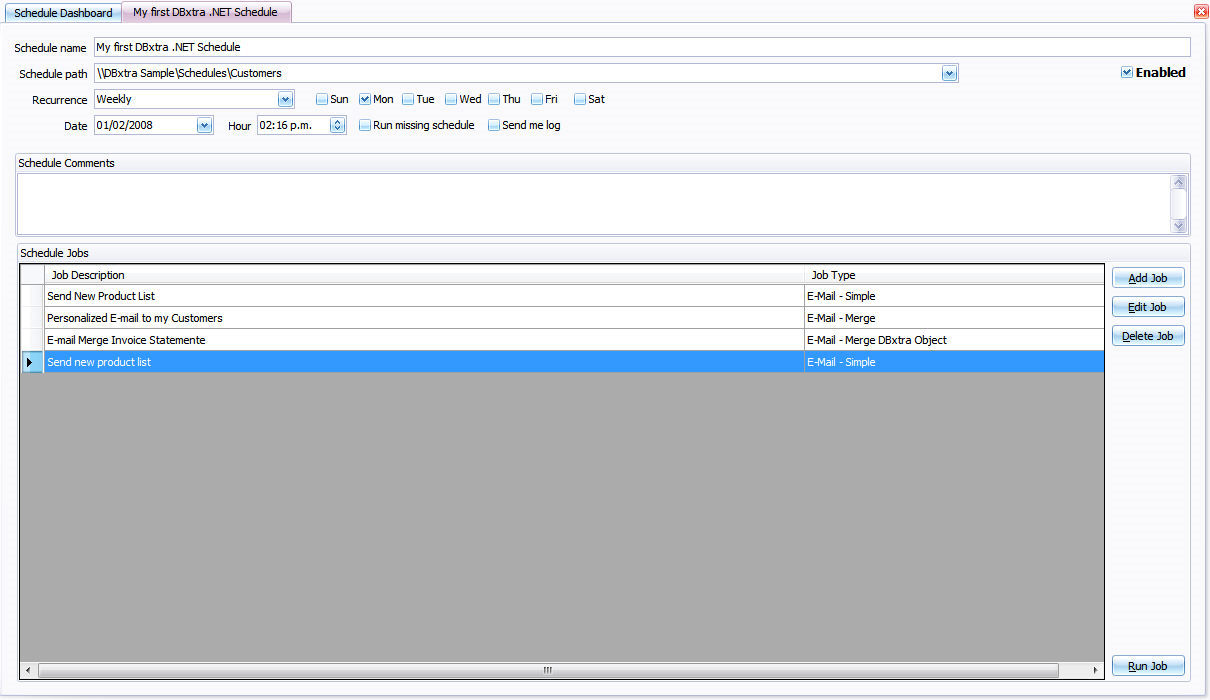
- Click Save .